


Learning how to build a foldable shoe cabinet step by step is a rewarding DIY project. It provides a highly practical and space-saving storage solution, especially for small homes and apartments. A foldable shoe cabinet offers the convenience of traditional storage when needed. It then collapses down to a minimal footprint when not in use. This makes it an ideal choice for tiny entryways, closets, or dorm rooms.
This definitive guide provides an expert, detailed walkthrough of the entire building process. It covers everything from planning and material selection to cutting, assembly, and finishing. These instructions will empower you to create a custom, functional, and stylish piece of furniture.
What Exactly is a Foldable Shoe Cabinet?
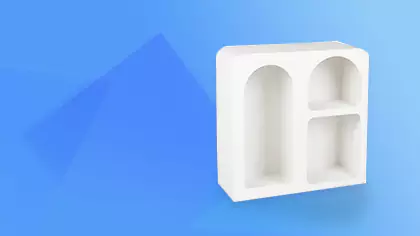
A foldable shoe cabinet is a piece of furniture designed to store shoes that can be collapsed or folded into a more compact form when not fully utilized. Unlike standard, rigid shoe cabinets, its structure incorporates hinges or pivoting mechanisms. These allow sections of the cabinet or its shelves to fold flat or retract, significantly reducing its overall depth or size.
This design is specifically aimed at maximizing space efficiency. It provides accessible shoe storage when open or in use. It then minimizes its physical presence when closed or folded away. This makes it an ingenious solution for areas where space is at a premium, offering flexibility that fixed furniture cannot. It is a prime example of smart DIY practical shoe storage.
Why Should You Build a Foldable Shoe Cabinet?
Building a foldable shoe cabinet offers several compelling advantages, particularly for DIY enthusiasts looking for practical home solutions. It combines the benefits of custom design with significant space-saving potential, making it a worthwhile project for many homeowners.
What is the Primary Benefit of Space Saving?
The primary benefit is significant space saving. In small apartments, narrow hallways, or cluttered closets, floor space is precious. A foldable cabinet provides essential shoe storage without permanently consuming a large footprint. When folded, it can sit almost flush against a wall or be tucked away easily. This adaptability is invaluable in multi-functional living spaces. This makes it one of the most clever hidden shoe storage ideas for apartments.
How Does DIY Offer Customization?
Building the cabinet yourself allows for complete customization. You can tailor the dimensions precisely to fit your available space. You can determine the number of tiers based on your shoe collection. You can choose the wood and finish to perfectly match your existing decor. This level of personalization is often impossible to find in off-the-shelf furniture. You control the final look and function entirely.
Is Building Your Own Cost-Effective?
Yes, building your own foldable shoe cabinet can be very cost-effective compared to buying a pre-made unit, especially a custom-sized one. Basic lumber, hinges, and screws are relatively inexpensive materials. By providing the labor yourself, you avoid the significant markup associated with manufactured furniture. This makes it an excellent budget shoe cabinet idea. The cost savings allow you to potentially invest in higher-quality wood or hardware.
What is the Benefit of Portability?
Depending on the design and size, a foldable shoe cabinet can also be relatively portable. Its ability to collapse makes it easier to move between rooms or transport if you relocate. This is particularly advantageous for renters or students who move frequently. A lightweight design enhances this portability.
What Essential Tools and Materials Are Needed?
Before beginning construction, gathering the right tools and materials is crucial. Having everything prepared ensures a smoother and safer building process. Precision in measurement and cutting is key, requiring appropriate tools.
What Are the Necessary Woodworking Tools?
A basic set of woodworking tools is required. Accuracy is more important than having the most expensive equipment.
- Measuring Tools: Tape measure, square, pencil. Accuracy here prevents problems later.
- Cutting Tools: A handsaw can work, but a circular saw or miter saw will provide cleaner, more accurate cuts, especially for multiple pieces. A table saw offers the highest precision for ripping boards to width.
- Drilling Tools: Electric drill with various drill bits (including countersink bits) for pilot holes and driving screws.
- Assembly Tools: Screwdrivers or screw gun, clamps (essential for holding pieces together while joining).
- Safety Gear: Safety glasses, hearing protection (if using power tools), dust mask, work gloves. Safety is paramount, as emphasized in guides like safety tips for glass cutting and grinding, and the principles apply to wood too.
What Are the Best Materials for a DIY Cabinet?
The choice of materials affects the cabinet’s look, weight, durability, and cost.
- Wood:
- Pine Boards: Inexpensive, lightweight, and easy to work with. Ideal for beginners. Softwood, so it dents more easily.
- Plywood: Strong, stable, and available in large sheets. Birch plywood offers a clean, modern look. Requires edge banding for a finished appearance.
- Hardwoods (Oak, Maple): More expensive and heavier, but offer superior durability and a high-end look. More challenging to cut and assemble.
- Hardware:
- Hinges: Crucial for the folding mechanism. Choose hinges appropriate for the design (e.g., piano hinges for long continuous folds, butt hinges for individual shelf pivots). Quality hinges ensure smooth operation.
- Screws: Wood screws of appropriate length and type (e.g., self-tapping). Use corrosion-resistant screws if the cabinet might be exposed to moisture.
- Wood Glue: Adds significant strength to joints when used with screws.
- Optional: Latches (to keep it folded), handles, magnetic catches, feet or casters.
- Finishing Supplies: Sandpaper (various grits), wood filler, paint or stain, sealant (polyurethane or wax).
How Do You Choose the Right Hinges?
Choosing the right hinges is critical for the folding action. Consider:
- Load Capacity: Ensure the hinges are strong enough to support the weight of the shelves and shoes.
- Range of Motion: Select hinges that allow the desired folding action (e.g., folding completely flat).
- Appearance: Choose a finish (brass, nickel, black) that complements your design.
- Type:
- Piano Hinges: Long, continuous hinges. Good for joining large folding sections.
- Butt Hinges: Standard door-style hinges. Suitable for individual pivoting shelves or smaller folding parts. Requires precise installation.
- Concealed Hinges: Offer a cleaner look but are more complex to install.
How Do You Plan Your Foldable Shoe Cabinet Design?
Careful planning before cutting any wood is the secret to a successful DIY project. This phase involves determining the dimensions, designing the folding mechanism, and creating a clear cutting list and assembly plan. A good plan minimizes mistakes and material waste.
How to Determine the Optimal Size and Capacity?
First, determine the capacity needed. Count the pairs of shoes you intend to store. Measure a few pairs (including bulky ones) to establish the necessary shelf depth and height. Then, measure the space where the cabinet will be used. Determine the maximum allowable width, height, and unfolded depth. Crucially, also decide on the desired folded depth – how slim do you need it to be when collapsed? These measurements define the overall dimensions of your project.
What Are Different Folding Mechanism Designs?
Several folding mechanism designs are possible. The complexity varies.
- Simple Bi-Fold: Two main cabinet sections are hinged together like a book. Shelves might be fixed within each section. Folds in half width-wise.
- Collapsing Shelves: The main frame might be fixed, but the individual shelves pivot on hinges and fold upwards or downwards against the back panel, allowing the sides to fold inwards.
- Accordion Style: Multiple narrow sections are hinged together, folding like an accordion. Shelves might need to be removable or pivot.
- Drop-Down Shelves: Shelves are hinged at the back and fold down flat against the frame when not in use. Requires latches to hold shelves up. Sketch out different ideas. Consider the complexity of the joinery and hinge installation for each.
Why Should You Create a Detailed Cutting List?
Creating a detailed cutting list before you start cutting is essential. Based on your design sketch and dimensions, list every single piece of wood needed. Specify its exact length, width, and quantity. Double-check all measurements. A precise cutting list prevents errors, ensures you buy the right amount of material, and makes the cutting process much more efficient. Many lumber suppliers offer cutting services, which can save time and ensure accuracy if you provide a clear list.
What is the Importance of Sketching or Simple Plans?
Creating a simple sketch or plan, even if not a formal blueprint, is incredibly helpful. It allows you to visualize the assembly sequence. You can work out how the pieces will join together and where the hinges need to go. Numbering the pieces on your sketch and correlating them to your cutting list provides a clear roadmap for assembly. Simple 3D modeling software (even free options) can also be useful for visualizing complex folding actions.
What is the Step-by-Step Guide to Building the Cabinet?
This section provides a detailed, step-by-step guide based on a common design: a cabinet with pivoting shelves that allow the sides to fold inwards. Adapt these steps based on your specific chosen design. Precision and patience are key throughout.
Step 1: How to Accurately Measure and Cut the Wood?
Using your cutting list, accurately measure and mark each piece of wood. Use a square to ensure your marking lines are perfectly perpendicular. When cutting with a power saw, clamp the wood securely. Use a guide for straight cuts. Cut exactly on your marked lines. Accuracy at this stage is paramount. Even small errors can compound during assembly. Cut all identical pieces (like shelves or side panels) at the same time to ensure consistency.
Step 2: How Do You Sand and Prepare All Pieces?
Once all pieces are cut, sanding is necessary for a smooth finish and safe handling. Start with a medium-grit sandpaper (e.g., 120-grit) to smooth cut edges and remove any saw marks. Pay special attention to edges that will be visible or handled frequently. Follow up with a finer grit (e.g., 220-grit) for a silky-smooth surface. If you plan to paint or stain, thorough sanding ensures the finish adheres properly. After sanding, wipe away all dust with a tack cloth or a slightly damp rag.
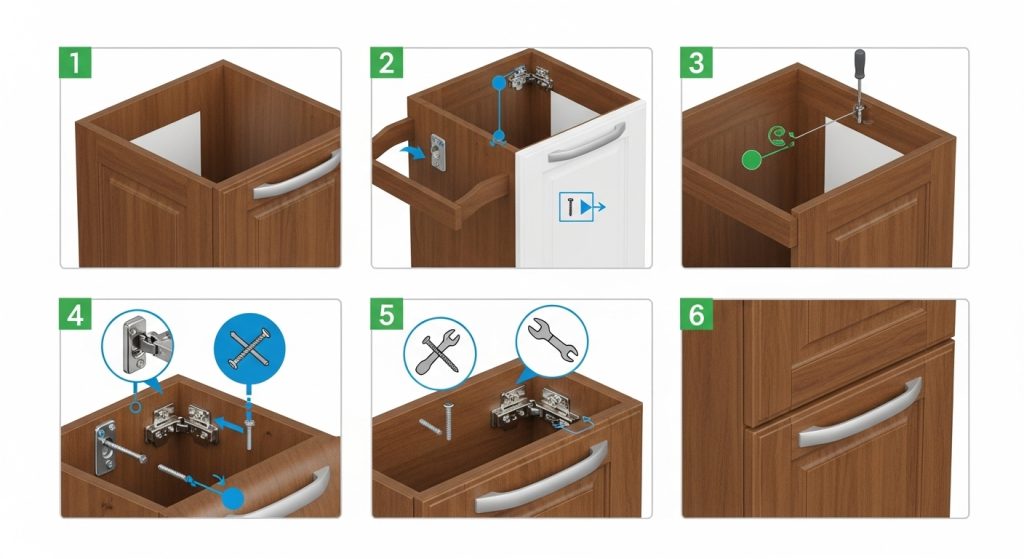
Step 3: How to Assemble the Main Frame(s)?
Assemble the main structural components. For a design where sides fold inwards, you might have a central back panel and two side panels.
- Apply Wood Glue: Apply a thin, even layer of wood glue to the joining edges.
- Drill Pilot Holes: Drill pilot holes slightly smaller than your screw diameter. This prevents the wood from splitting, especially near edges. Use a countersink bit so the screw heads sit flush or slightly below the surface.
- Join Pieces: Clamp the pieces together firmly. Drive screws through the pilot holes to secure the joint. Use a square to constantly check that your corners are exactly 90 degrees. Wipe away any excess glue squeeze-out immediately with a damp cloth.
Step 4: How to Install the Shelves?
Installing the shelves requires precision, especially if they are designed to pivot.
- Fixed Shelves (if any): Attach using glue and screws through pilot holes, ensuring they are perfectly level.
- Pivoting Shelves: This is the tricky part. Shelves might be attached to the back panel using small butt hinges placed along the back edge. Alternatively, pivot points can be created using dowels or specialized hardware inserted into the sides of the shelves and the frame. The exact method depends on your design. Ensure shelves pivot smoothly without binding.
Step 5: How Do You Attach the Hinges for the Folding Action?
Attaching the main folding hinges requires careful alignment. For a bi-fold design or sides folding inwards, lay the sections flat and align them perfectly. Mark the hinge locations accurately. Pre-drill pilot holes for the small hinge screws. Attach the hinges securely, ensuring they operate smoothly and allow the cabinet to fold as intended. Use the correct number and size of hinges to support the weight of the moving section. High-quality hinges make a significant difference in the feel and longevity of the piece.
Step 6: Should You Add Back Panels or Bracing?
For a foldable design, full back panels can add unnecessary weight and bulk. However, some bracing is usually needed for stability, especially when the cabinet is unfolded. Consider adding:
- Diagonal Braces: Small corner braces or a thin diagonal strut across the back of the main section can prevent racking.
- Partial Back Panel: A small panel across the top or bottom can add rigidity without adding much weight. The goal is to ensure the cabinet is stable when open and loaded with shoes, without hindering the folding mechanism.
Step 7: How to Apply Paint, Stain, or Sealant?
Finishing protects the wood and provides the desired aesthetic.
- Preparation: Fill any screw holes with wood filler and sand smooth once dry. Perform a final light sanding of the entire piece.
- Application: Apply your chosen finish (paint, stain, or clear sealant) according to the manufacturer’s instructions. Use thin, even coats. Allow adequate drying time between coats. Sand lightly between coats (for paint/sealant) for the smoothest result.
- Ventilation: Always work in a well-ventilated area when applying finishes. Follow all safety precautions listed on the product label.
Step 8: What is the Final Assembly and Hardware Installation?
The final step involves adding any remaining hardware.
- Latches/Catches: Install small latches, magnetic catches, or hooks and eyes to keep the cabinet securely closed when folded.
- Handles (Optional): Add handles if needed to make unfolding easier.
- Feet/Casters (Optional): Add small feet to protect floors or casters for easier portability. Perform a final check of the folding mechanism to ensure everything operates smoothly.
Conclusion
Learning how to build a foldable shoe cabinet step by step empowers you to create a truly custom and highly practical piece of furniture. This DIY project is an excellent solution for anyone struggling with shoe clutter in a small space. By combining careful planning, accurate execution, and a touch of creativity, you can build a stylish, space-saving cabinet that perfectly meets your needs and complements your home’s decor. It is a rewarding endeavor that results in a tangible improvement to your daily organization and entryway appeal. For more ideas on tackling tight entryways, explore our small entryway hacks to hide shoes neatly.


