


The art of repurposing furniture into shoe cabinets is a creative, sustainable, and remarkably budget-friendly approach to tackling entryway clutter. Instead of buying new, specialized storage, this method involves transforming existing or secondhand furniture pieces—like old bookcases, dressers, or media consoles—into stylish and functional shoe storage solutions.
This definitive guide provides an expert framework for these inventive DIY practical shoe storage projects. It explores the core principles, identifies the best furniture candidates, offers step-by-step makeover ideas, and provides professional tips to ensure your repurposed creation is both beautiful and perfectly suited to keeping your home organized.
What is the Core Philosophy of Repurposing Furniture?
The core philosophy of repurposing furniture is seeing potential beyond the original purpose. It is about recognizing the inherent structure, materials, and storage capacity within an existing piece and creatively adapting it to meet a new need. This approach champions resourcefulness, sustainability, and the creation of unique, personalized home furnishings.
This mindset shifts away from a disposable consumer culture towards one of thoughtful upcycling. It finds value in the old, the outdated, or the simply overlooked. By giving a piece of furniture a second life, you are not only saving money but also reducing waste and creating something with character and a story. This aligns with the growing global emphasis on sustainability in design and manufacturing. It is the ultimate expression of creative problem-solving in home decor.
How Does Repurposing Differ from Refinishing?
Repurposing differs from simple refinishing. Refinishing typically involves updating the cosmetic appearance of a piece (e.g., painting or restaining) while maintaining its original function. Repurposing involves fundamentally changing the purpose of the furniture, often requiring structural modifications alongside cosmetic updates. Turning a bookcase into a shoe cabinet is repurposing; painting that same bookcase to continue holding books is refinishing.
What Are the Main Benefits of Repurposing?
Repurposing furniture, particularly for shoe storage, offers several compelling benefits:
- Cost Savings: Finding a sturdy secondhand piece and modifying it is almost always significantly cheaper than buying a new, high-quality shoe cabinet.
- Sustainability: It keeps old furniture out of landfills, reducing waste and the environmental impact associated with manufacturing new goods.
- Unique Style: Repurposed pieces are often one-of-a-kind, adding unique character and a personal touch to your home that mass-produced items cannot match.
- Customization: You can tailor the repurposed piece perfectly to your specific storage needs and space constraints.
Why Repurpose Furniture Specifically into Shoe Cabinets?
Repurposing furniture specifically into shoe cabinets is a particularly effective strategy because many common furniture types already possess the basic structural elements needed for shoe storage—shelves, drawers, or compartments. This makes the transformation relatively straightforward while addressing one of the most persistent organizational challenges in many homes: shoe clutter.
Shoes are awkward items to store neatly. They come in various sizes and shapes, and they often accumulate near entry points. Standard furniture rarely accommodates them well. By adapting existing pieces, you can create dedicated, often clever hidden shoe storage ideas for apartments, that solve this specific problem elegantly and affordably. It is a practical application of the repurposing philosophy targeted at a common household pain point.
How Does it Solve Entryway Clutter Affordably?
Entryway clutter, particularly shoe piles, is a major issue in many homes, especially small ones. Dedicated shoe cabinets can be surprisingly expensive. Repurposing an inexpensive thrift store find or an unused piece you already own provides an extremely budget shoe cabinet idea. The primary cost is your time and some basic materials like paint or extra shelves, making it accessible even on a tight budget.
How Does it Allow for Custom Storage Solutions?
Repurposing allows you to create custom solutions tailored to your specific shoe collection and space. Need extra-tall compartments for boots? Modify the shelf spacing in an old bookcase. Need many small slots for flats and sandals? Add dividers to a dresser drawer. This level of customization ensures the final piece is perfectly suited to your needs, unlike generic, off-the-shelf options.
What Unique Styles Can Be Achieved?
Repurposing allows you to achieve unique styles that blend the character of the original piece with its new function. An ornate vintage dresser transformed into shoe storage adds a touch of unexpected glamour to an entryway. A rustic wooden crate system offers authentic farmhouse charm. This potential for unique aesthetic expression is a major draw for creative homeowners.
What Types of Furniture Offer the Best Repurposing Potential?
Certain types of furniture are naturally better suited for repurposing furniture into shoe cabinets due to their existing structure and dimensions. Look for pieces that offer appropriate depth, potential for internal modification, and sturdy construction.
Why Are Old Bookcases Ideal Candidates?
Old bookcases are often ideal candidates, especially taller, narrower models.
- Depth: Typically have a depth (around 10-12 inches) that is perfect for most shoe sizes.
- Shelving: Already equipped with multiple shelves, often adjustable, providing a ready-made structure.
- Versatility: Can be painted or refinished easily. Doors or curtains can be added for concealed storage.
- Availability: Widely available at low cost from thrift stores or online marketplaces.
How Can Dressers and Chests of Drawers Be Adapted?
Dressers offer the benefit of existing drawers for concealed storage.
- Drawer Depth: Check if the drawers are deep enough to hold shoes upright or laid flat. Deeper bottom drawers are often suitable.
- Modification Potential: Some drawers can be removed entirely to create open cubbies within the dresser frame for displaying boots or baskets.
- Sturdy Construction: Older dressers are often made from solid wood with good joinery.
- Surface Use: The top surface provides a valuable landing strip in an entryway.
What Potential Do TV Consoles and Media Stands Offer?
Older TV consoles or media stands, especially those designed before flat-screen TVs became standard, often have compartments and shelves that are well-suited for shoe storage.
- Compartments: Sections designed for VCRs or DVD players can often fit shoes.
- Cable Management Holes: Existing holes in the back panel can provide ventilation.
- Sturdiness: Built to hold heavy electronics, they are typically very sturdy.
- Style: Available in a wide range of styles, from traditional wood to modern laminate.
How Can Vintage Trunks or Chests Serve as Hidden Storage?
Vintage trunks (like steamer trunks) or wooden blanket chests offer excellent potential for completely hidden storage.
- Capacity: Offer a large, open interior space.
- Aesthetics: Add significant character and a unique focal point. Can double as a bench.
- Concealment: Shoes are completely out of sight when the lid is closed.
- Modification: Simple dividers can be added inside. A safety hinge for the lid is recommended.
What About Kitchen Cabinets or Sideboards/Buffets?
Old kitchen base cabinets or dining room sideboards/buffets can also be repurposed.
- Sturdy Construction: Typically built to be durable and functional.
- Existing Compartments: Already feature shelves and doors or drawers.
- Depth: Usually have ample depth for shoes.
- Style Potential: Can be painted or refinished to match entryway decor. Look for pieces with simple lines.
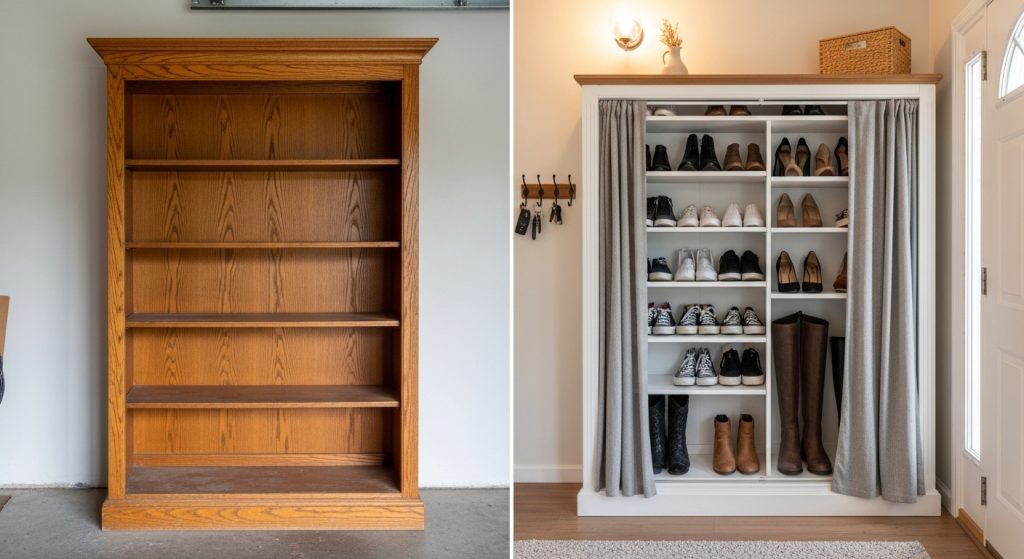
Project Idea 1: How to Repurpose a Bookcase
Transforming a simple bookcase into a stylish and functional shoe cabinet is a straightforward and highly effective repurposing project. It primarily involves adjusting the shelving and potentially adding concealment.
Step 1: How Do You Prepare the Bookcase?
Start by thoroughly cleaning the bookcase. Remove any existing shelves. Assess the structural integrity – reinforce any wobbly joints with wood glue and screws if necessary. Lightly sand the entire piece to prepare it for painting or finishing. Fill any unwanted holes with wood filler and sand smooth.
Step 2: How to Modify or Add Shelves for Shoes?
The key modification is optimizing the shelf spacing for shoes. Measure the height of your typical shoes (sneakers, flats) and taller items (boots, heels). Plan the shelf layout accordingly.
- Adjust Existing Shelves: If the bookcase has adjustable shelf pins, simply reposition the shelves.
- Add New Shelves: Cut new shelves from plywood or pine boards. Install them using shelf pins (drill new holes) or by attaching small wooden cleats to the inside walls for the shelves to rest on. Aim for a shelf height of 6-8 inches for most shoes, with a taller space (12-18 inches) at the bottom for boots.
- Angle Shelves (Optional): For a shallower bookcase, consider installing the shelves at a slight angle (sloping downwards towards the back). This allows longer shoes to fit within a narrower depth.
Step 3: Should You Add Doors or a Curtain?
Adding doors or a curtain transforms the open bookcase into concealed storage, ideal for hiding shoe clutter.
- Doors: Simple doors can be made from thin plywood or MDF, cut to size. Attach them using basic cabinet hinges. Add simple knobs or pulls. This requires more woodworking skill.
- Curtain: A simpler option is to install a small tension rod or a curtain track inside the top of the bookcase frame. Hang a simple fabric curtain (like linen or canvas) that can be easily pulled across to hide the contents. This adds softness and texture.
Step 4: How to Paint or Refinish for a Custom Look?
Apply your chosen finish. Prime first if needed. Apply two or three thin coats of paint (chalk paint, latex enamel) or stain, sanding lightly between coats for a smooth finish. Seal with a durable topcoat like polyurethane or furniture wax, especially on the shelves where shoes will cause wear. This cosmetic step is crucial for making the repurposed piece look intentional and stylish.
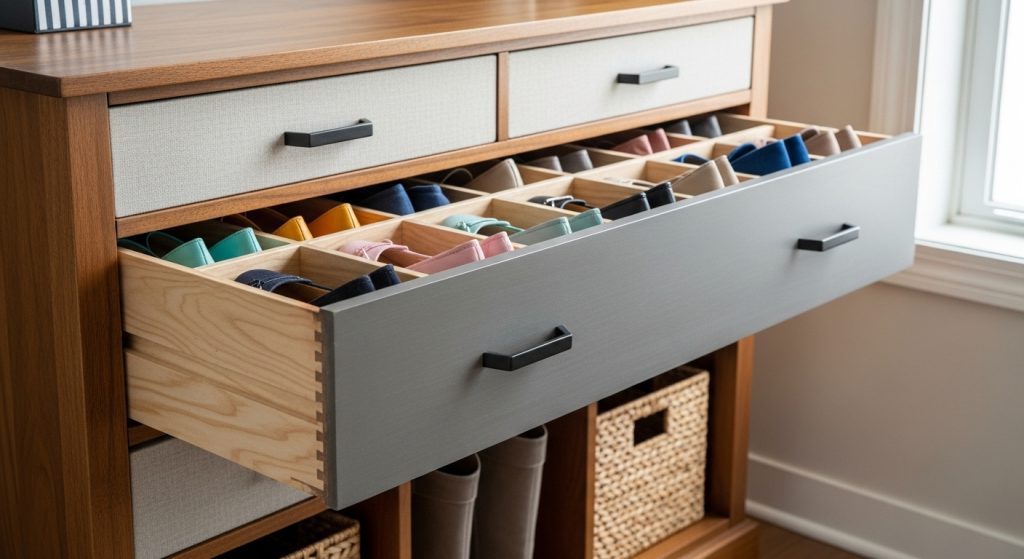
Project Idea 2: How to Convert a Dresser
Converting an old dresser offers the immediate advantage of built-in drawers for concealed storage. The modifications often focus on optimizing the drawer interiors or creating a mix of open and closed storage.
Step 1: How to Prep the Dresser?
Remove all drawers. Clean the dresser frame and the drawers thoroughly. Remove the old hardware. Make any necessary repairs to the frame or drawer glides. Lightly sand the entire piece to prepare for refinishing. Fill old hardware holes if you plan to use new hardware with different spacing.
Step 2: How to Adapt Drawers for Shoe Storage?
Assess the drawer depth. Deeper drawers are better suited for shoes.
- Add Dividers: Install simple dividers made from thin craft wood or sturdy cardboard inside the drawers. Create individual compartments for each pair to keep them organized and prevent shifting.
- Line the Drawers: Consider lining the drawers with shelf liner or fabric to protect shoes and make cleaning easier.
Step 3: Can You Create Open Cubbies by Removing Drawers?
Yes, removing one or two drawers (often the bottom ones) can create open cubby spaces within the dresser frame. This is ideal for storing taller boots or adding decorative baskets. The inside surfaces of the resulting cubby will likely need to be cleaned, possibly painted, and potentially reinforced with a bottom shelf if the original drawer support is removed.
Step 4: How to Refinish and Update Hardware?
Refinish the dresser frame and drawer fronts with your chosen paint or stain. This is your opportunity to completely change the style. Once the finish is dry, install new hardware (knobs or pulls). Modern, simple hardware can instantly update the look of an older dresser. The impact of new hardware on furniture makeovers is significant. [Insert Credible Statistic/Study Source B on the impact of hardware updates].
Project Idea 3: How to Utilize a Vintage Trunk
A vintage trunk offers charming, completely hidden storage and requires minimal modification. It is one of the simplest repurposing furniture into shoe cabinets projects.
Step 1: How to Clean and Prepare the Trunk Interior?
The interior of an old trunk can often be dusty or musty. Clean it thoroughly with a vacuum cleaner. Wipe down the surfaces with a slightly damp cloth and mild soap if needed. Allow it to air out completely. For persistent odors, placing an open box of baking soda inside for a few days can help. Consider lining the interior with cedar planks (which repel moths and absorb moisture) or adhesive felt/fabric liner for a cleaner finish.
Step 2: Should You Add Internal Dividers?
Adding internal dividers is optional but helpful for organization. Simple dividers can be made from thin plywood or even sturdy cardboard, cut to fit snugly inside the trunk. Create compartments sized appropriately for pairs of shoes. This prevents shoes from becoming a jumbled pile inside.
Step 3: Why Install a Safety Hinge?
Installing a safety hinge or a lid stay is highly recommended, especially for heavy wooden trunk lids. These devices prevent the lid from accidentally slamming shut, which can be dangerous. Choose a hinge rated for the weight of your lid.
Step 4: How to Refinish the Exterior (Carefully)?
Refinishing the exterior should be done carefully to preserve the trunk’s vintage character. Often, a simple cleaning and waxing is sufficient. If the finish is badly damaged, a light sanding and a new coat of stain or sealant might be necessary. Avoid overly aggressive stripping or painting that erases the trunk’s history.
Conclusion
Repurposing furniture into shoe cabinets is a brilliant fusion of creativity, sustainability, and practical problem-solving. By looking at old bookcases, dressers, trunks, and consoles with fresh eyes, you can unlock hidden potential and create truly unique and functional storage solutions. These DIY practical shoe storage projects are not only budget-friendly but also deeply rewarding. They allow you to rescue a piece from landfill, tailor it perfectly to your needs, and add a touch of handcrafted character to your home. It is the ultimate way to achieve stylish small entryway hacks to hide shoes neatly with a story to tell.


