


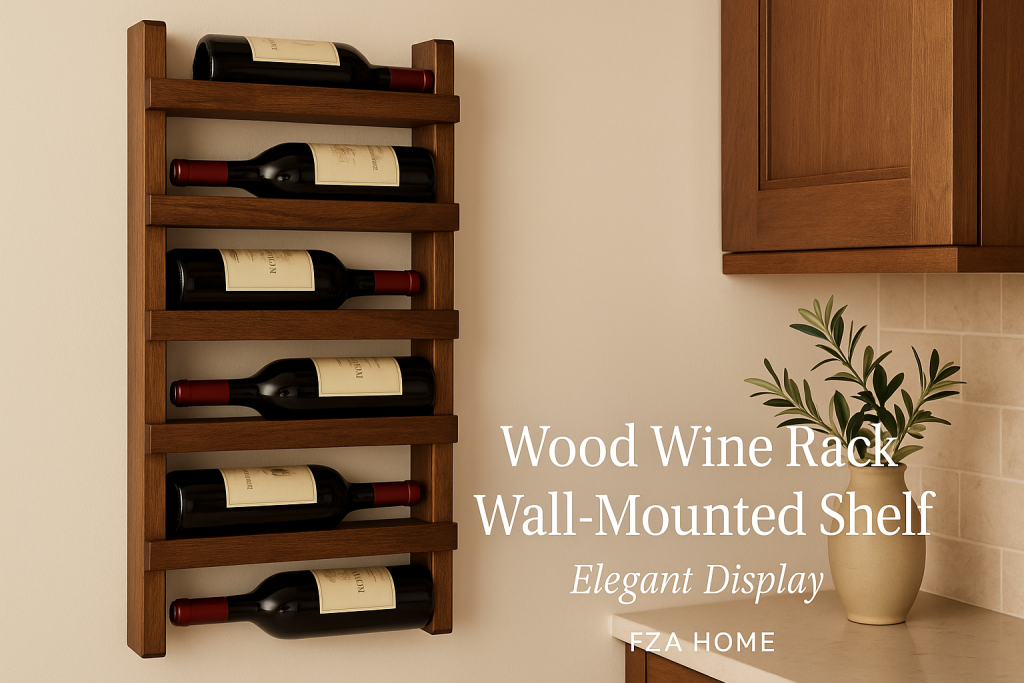
Whether you’re an oenophile with an ever-expanding collection or simply love the look of wine bottles artfully displayed, a wood wine rack wall-mounted shelf is a transformative piece for any home. By lifting bottles off the floor and onto the wall, you not only save precious real estate but also turn your collection into functional décor—think of it as a gallery for your favorite vintages. In this guide, we’ll demystify everything you need to know, from types and materials to installation tricks and styling tips, ensuring your wooden wine shelf becomes both a showpiece and a long-lasting storage solution.
Understanding Wood Wine Rack Wall-Mounted Shelves
What Is a Wall-Mounted Wine Shelf?
A wall-mounted wine shelf is a bracketed or anchored unit attached directly to a wall, designed specifically to cradle wine bottles horizontally. Unlike freestanding racks that hog floor space—much like a bulky sofa in a tiny living room—these shelves lean on vertical space, making them perfect for kitchens, dining rooms, home bars, or even hallways. They range from simple ledges with U-shaped grooves for bottle necks to elaborate multi-shelf systems with integrated glass holders and decorative backboards.
Why Choose Wood Over Metal or Acrylic?
Wood brings a warmth and organic beauty that metal or acrylic simply can’t match. It’s like comparing a crisp white shirt to a cozy cashmere sweater—both serve the same function, but one wraps you in comfort and character. Wood also offers natural insulation, protecting your wine from rapid temperature swings. And because wood is so versatile, you can stain, paint, or distress it to perfectly suit your existing décor. While metal has its place in industrial lofts and acrylic fits minimalist spaces, wood remains the timeless choice for those seeking both style and substance.
Benefits of Wood Wine Rack Wall-Mounted Shelves
Space-Saving Advantages
Imagine your floor as valuable real estate—every inch counts. A wall-mounted shelf takes your wine collection off counters and cabinets, freeing up workspaces and walking paths. In a compact city kitchen, a floating wood rack can hold a dozen bottles above the backsplash, eliminating clutter and making meal prep feel effortless and zen-like.
Warmth and Aesthetic Appeal
Wood automatically adds warmth and texture to a room. Whether you choose a deep walnut stain that whispers “sophistication” or a reclaimed pine finish that shouts “rustic retreat,” your wine shelf becomes a focal point. Paired with soft accent lighting, your bottles gleam like gems on a wooden tapestry.
Customization and Flexibility
Wood is your blank canvas. You can cut lengths to fit awkward nooks, add decorative trim, or even carve initials and motifs for a personal touch. Unlike pre-built metal racks—which often come in cookie-cutter sizes—wood allows for infinite customization. Want a zigzag pattern? A hidden shelf behind a picture frame? With wood, your imagination sets the limit.
Types of Wood Wine Rack Wall-Mounted Shelves
Floating Slatted Shelves
These sleek designs use horizontal wooden slats with notches or slots to cradle each bottle. The bottles appear to float against the wall—like boats docked in a miniature harbor. They’re ultra-modern, easy to dust, and perfect for small to medium collections.
Ledge-Style Bottle Racks
Simple and elegant, ledge racks are single planks with U-shaped cutouts. They suit minimalist interiors and are often the most budget-friendly. Installation is straightforward: two hidden brackets hold the shelf flush, and the bottles rest securely in the cutouts, labels facing out.
Modular Cubby Systems
Think of these as wine “apartments.” Individual cube compartments stack together in grids, allowing you to expand as your collection grows. Each cubby snugly holds a bottle, and the modular design means you can reconfigure the shape—L-shaped, square, or even a cascading staircase pattern.
Integrated Glass Stem Holders
For those who like to keep both bottles and glassware at arm’s reach, choose a shelf with under-mounted stemware racks. Picture your wine glasses suspended upside down beneath the wood—like leaves on a branch—creating a cohesive, bar-style display.
Materials and Wood Varieties
Solid Hardwood (Oak, Maple, Teak)
- Oak: Known for its pronounced grain and strength, oak is a classic choice that withstands heavy loads and resists dents.
- Maple: Tighter grain and lighter color make maple ideal for bright, contemporary spaces.
- Teak: Naturally oily and water-resistant, teak is perfect for humid areas or near wet bars.
Engineered Wood and Plywood
If cost is a concern but you still want a wood-look, high-quality plywood with a hardwood veneer offers stability and resistance to warping. It’s less prone to splitting than solid planks, though it may lack the heft and authenticity of true hardwood.
Reclaimed and Rustic Wood Options
For an eco-friendly, character-rich approach, reclaimed barn wood or salvaged timber brings knots, nail holes, and weathered textures into your home. Each shelf is one-of-a-kind—imagine each bottle resting on a piece of history.
Key Features to Consider Before Buying
Bottle Capacity and Spacing
Count your bottles—and then add a few more for future purchases. Shelves should allow 1–2 inches of space between bottles so labels don’t rub and air can circulate. A dozen-bottle shelf might fit 14 if spaced well; measure your average bottle diameter (about 3 inches) to calculate total shelf length.
Installation Hardware and Wall Support
Heavy wooden shelves loaded with wine can weigh 30–50 pounds easily. Look for lag-bolt brackets that anchor into studs, or use heavy-duty toggles for hollow-wall installation. Some shelves include French cleat systems for an extra-secure, level mount.
Finishes, Coatings, and Durability
Choose a finish that protects against moisture and UV light. A clear polyurethane topcoat brings out the wood’s grain while guarding against spills. For a more natural look, a food-safe mineral oil finish can be reapplied annually to maintain hydration and prevent cracking.
Key Features to Consider Before Buying
Bottle Capacity and Spacing
Before you click “add to cart,” take a hard look at how many bottles you actually own—and imagine how many you might accumulate over the next few years. Your wood wine rack should be able to hold your current collection comfortably, plus leave room for new vintages. A good rule of thumb is to plan for 20–30% more slots than you need today.
Spacing matters too: if bottles are crammed together, labels can rub off, and air circulation—vital for stable temperatures—becomes limited. Aim for at least 1 – 2 inches of clearance between bottles. Measure your tallest and widest bottles (some Champagne and magnums can be bulky), and be sure the shelf’s not just long enough but also deep enough so nothing tips forward.
Think of capacity and spacing like seating at a dinner party: you want guests close enough to chat (bottles close enough to look like a unified display) but not so crammed they can’t breathe (cork ends must stay moist). By planning with a little extra space, you’ll prevent frustration down the line and keep your collection looking neat and inviting.
Installation Hardware and Wall Support
A gorgeous slab of wood packed with 15 wine bottles can end up weighing well over 50 lbs—and that’s before you add glasses or decorative accents. You’ll need sturdy hardware: lag bolts, toggle bolts, or a French cleat system mounted into studs. If your studs don’t line up with your ideal layout, heavy-duty drywall anchors rated for at least twice the expected load are a must.
Pro tip: use a spirit level when marking anchor points to ensure your shelf sits perfectly horizontal. Even a one-degree tilt can cause bottles to roll awkwardly or place uneven stress on the wall. If you’re not comfortable drilling into studs or using specialized anchors, consider hiring a handyman for installation. It’s a small investment to prevent a big (and messy) wall collapse later.
Finishes, Coatings, and Durability
Wood loves moisture—until it warps, cracks, or swells—so pick a finish that locks out humidity and stains. A clear polyurethane topcoat accentuates natural grain while protecting against spills, whereas a water-based varnish offers low odor and quick drying. For a more natural look, food-grade mineral oil can be reapplied seasonally to keep wood hydrated.
If your shelf is near a sink or bar area, look for UV-resistant and scratch-resistant finishes to stand up to everyday use. Remember: a well-finished shelf isn’t just about aesthetics—it’s about ensuring your rack stays straight, strong, and beautiful for years to come.
Measuring and Placement Strategies
Ideal Height and Reachability
Reachability is key—nobody wants to haul out a chair to grab their favorite Pinot Noir. Aim to place the center of your wine shelf at roughly 48–54 inches from the floor, which is standard eye level when standing. Top rows should be no higher than 60–66 inches to prevent stretching or stepping on chairs, and bottom rows no lower than 24 inches so you’re not stooping in an awkward, wine-sloshing angle.
Avoiding Heat and Light Exposure
Just like people, wine bottles don’t appreciate direct sun or hot air. Avoid mounting shelves above radiators, heat vents, or next to oven hoods. North- or east-facing walls tend to stay cooler and shielded from harsh afternoon rays. If your only option is a south- or west-facing wall, consider UV-filtering window film or a UV-resistant finish on your rack to prevent premature aging and sun damage.
Coordinating with Surrounding Décor
Your wine shelf shouldn’t look like a lone island; it should integrate seamlessly with cabinets, art, or accent walls. If you have open shelving or floating cabinets nearby, try matching wood tones or hardware finishes. Use picture-frame molding or a contrasting backboard paint color to create a “stage” for your bottles, turning them into functional wall art rather than just storage.
Installation Tips and Best Practices
Tools You’ll Need
- Stud finder: to locate reliable anchor points
- Spirit level: for perfectly horizontal mounting
- Measuring tape & pencil: to mark brackets precisely
- Cordless drill & bits: for pilot holes and anchors
- Lag bolts, toggles, or French cleat hardware: rated for your load
- Safety gear: goggles and gloves
Having these on hand before you start keeps the process smooth and prevents mid-installation runs to the hardware store.
DIY vs. Professional Mounting
If you’re comfortable with power tools and basic carpentry, a DIY install can save money and let you customize positioning. However, if your wall is plaster, brick, or you’re mounting a very heavy unit, a professional can ensure studs are properly reinforced and your shelf will remain safe under load.
Leveling and Securing for Safety
After anchoring your brackets, always re-check level before hanging the shelf. Even a small tilt can cause stress on one side, leading to eventual loosening. Once level, hand-tighten all screws, place a single bottle to test stability, then add the rest slowly—confirming there’s no shifting or creaking.
Styling Your Wine Shelf
Arranging Bottles for Visual Impact
Display wines like you’d arrange books: by color, region, or varietal. A gradient from dark reds to crisp whites creates a pleasing ombré effect. Try grouping labels face-out every few bottles to break up rows and showcase favorite vintages.
Mixing Glassware and Accessories
If your shelf includes under-mounted stemware holders, alternate bottle rows with glass rows for a dynamic look. Add a small ledge or shallow tray for corkscrews, decanters, or tasting notes. This creates a mini-bar vibe, making the shelf both decorative and functional.
Lighting and Decorative Accents
LED strip lights tucked beneath each shelf cast a soft glow, highlighting your collection and setting the mood for evenings in. Intermix small potted plants or wine-themed artwork above or beside the rack to complete the vignette. Think of your shelf as a stage—spotlight one or two bottles to star in your living room show.
Maintenance and Care
Cleaning Wooden Surfaces
Dust weekly with a microfiber cloth. For spills, wipe immediately with a damp cloth and mild soap—never let moisture sit. Every few months, reapply a protective wax or oil finish to nourish the wood.
Preventing Warping and Cracking
Maintain indoor humidity around 40–60%. In very dry climates, a small humidifier nearby can prevent the wood from drying out. Avoid placing hot items (like lamps or candles) directly on the shelf.
Seasonal Checks and Touch-Ups
Inspect hardware and brackets twice a year—tighten any loose screws and look for signs of stress. If the finish shows wear, lightly sand and recoat to maintain both appearance and protection.
DIY Wood Wine Rack Wall-Mounted Shelf Ideas
Pallet Wood Projects
Reclaimed pallets are a treasure trove for budget-friendly, eco-conscious DIYers. Begin by sourcing clean pallets—ask local warehouses or garden centers for ones free of chemical treatments. Disassemble them carefully using a pry bar and hammer, then sand each plank smooth to remove splinters. You can construct a simple ledge-style rack by affixing two horizontal support planks to the wall studs, then attaching vertical slats with evenly spaced notches to hold bottles. For extra flair, use a jigsaw to cut the notches in fun shapes—like waves or chevrons—so your bottles sit in a custom-fit groove. A coat of clear polyurethane preserves the wood’s character, while a strap hinge on one side can create a hinged cover for dust protection. This approach yields a one-of-a-kind shelf that combines rustic character with solid functionality, all for under $50 in materials.
IKEA Hack Shelves
IKEA’s minimalist shelving units are perfect canvases for wine-rack conversions. For example, the LACK wall shelf (approximately $20) can be outfitted with third-party metal wine rack inserts that slide into the underside. Simply measure the shelf’s depth, purchase holders rated for your bottle count, and screw them into predrilled holes. Paint the shelf to match your décor—try a high-gloss white for a Scandinavian look or a matte black for industrial chic. If you need stemware storage, add an EKBY BJÄRNUM bracket system beneath: these metal rails, originally designed for tabletops, work flawlessly for glass stems. By combining two or three shelves in a staggered layout, you can create a dynamic display that looks bespoke but costs less than $100 total.
Custom Carved Designs
For a truly personalized piece, carve your own rack from a solid plank of hardwood. Choose a dense wood like maple or cherry, which withstands carving and holds details crisply. Sketch your design—perhaps a vineyard silhouette or flowing vine pattern—onto the plank, then use a router to carve shallow grooves for bottle necks and a channel for the body. Finish the wood with a clear varnish to highlight the grain and protect the surface. Mount using a French cleat—it hides on the back and supports heavy weight. This approach takes more time and tools (a router, chisels, and perhaps a plunge saw), but the result is a museum-quality shelf that tells your story and showcases your craftsmanship.
Budgeting and Cost Considerations
Price Ranges by Material
- Reclaimed Pallet Wood: $30–$80 for DIY materials (sandpaper, screws, finish)
- IKEA Hack Shelves with Inserts: $50–$120 total
- Prebuilt Engineered Wood Shelf: $80–$200
- Solid Hardwood Custom Shelf: $150–$400, depending on wood species and finish
- Bespoke Carved Designs: $300–$800+, factoring in labor (if commissioned) and premium hardwood
When planning your budget, account not only for raw materials but also mounting hardware, tools (if you don’t already own them), and finishing supplies. If you’re hiring help—whether for routing, sanding, or professional installation—add labor costs accordingly (expect $40–$60/hour for skilled carpenters in most markets).
Where to Spend and Where to Save
- Save on: Bulk or reclaimed materials, IKEA shelf bases, basic drywall anchors.
- Splurge on: Quality hardwood for visible surfaces, UV-resistant finish, professional-grade mounting hardware, and expert labor for complex installations.
Investing in a durable finish and robust anchors pays off by preventing warping, surface damage, and, most critically, wall failures. On the other hand, decorative touches—like fancy end caps or elaborate carvings—can be postponed or DIY’d later when your budget allows.
Eco-Friendly and Sustainable Options
FSC-Certified Woods
FSC (Forest Stewardship Council) certification ensures your wood was harvested responsibly, preserving ecosystems and workers’ rights. Many suppliers offer FSC-certified oak, maple, and bamboo planks in various thicknesses—perfect for custom shelves that align with green building standards.
Reclaimed Timber Benefits
Reclaimed wood diverts material from landfills and reduces demand for newly cut timber. Beyond the environmental perks, reclaimed planks come with unique patina, knots, and grain patterns that no new wood can replicate. Look for local reclamation yards or salvage centers for affordable sourcing.
Non-Toxic Finishes
Traditional varnishes and polyurethanes emit volatile organic compounds (VOCs) that can affect indoor air quality. Opt instead for water-based, low-VOC finishes or natural oils—like tung or linseed oil—sealed with beeswax or plant-derived hardeners. These finishes are food-safe once cured and impart a subtle sheen while letting the wood breathe.
Real-World Inspirations
Small-Space Urban Kitchens
In micro-apartments, a single floating slatted shelf above the sink holds six to eight bottles without impeding cabinet doors. Pair with under-cabinet LED puck lights to illuminate the backsplash and create a cozy vibe when space is tight.
Rustic Farmhouse Bars
A large pallet-wood ledge, stained dark brown and mounted on a white shiplap wall, supports a 20-bottle collection above a butcher-block countertop. Beneath, wrought-iron stemware racks hold glasses—creating a charming “honor bar” effect that feels welcoming and homey.
Contemporary Minimalist Lofts
A continuous walnut plank stretches across an exposed brick wall, carved with concealed grooves for bottle necks. Brass inlay lines the edge, and integrated strip lighting beneath gives each row a floating illusion—perfect for loft dwellers who prize clean lines and high-end finishes.
Common Mistakes to Avoid
Overloading the Shelf
Respect both the wood’s and hardware’s load limits. Calculate total weight (15 bottles ≈ 40 lbs) and choose anchors rated for at least twice that weight. Overloaded shelves can pull out, causing damage and injury.
Ignoring Wall Integrity
Not all walls are created equal. Plaster, drywall, brick, and concrete each require specific anchor types. Using generic anchors in hollow drywall for a heavy load is a recipe for disaster. Always match anchor to substrate.
Poor Bottle Spacing
Cramming bottles edge-to-edge leads to label damage and makes individual bottle removal a hassle. Plan for ample clearance (1–2 inches) to ensure easy access and airflow.
Frequently Asked Questions
- Can I adjust the shelf for different bottle sizes?
Yes—choose adjustable slatted designs or carve notches yourself. Allow 4–4.5 inches vertically for Champagne or magnum bottles. - How do I keep the wood from warping in humid areas?
Apply a marine-grade varnish or UV-resistant topcoat. Maintain room humidity around 40–60% and avoid direct water contact. - Is it safe to install over a sink or stove backsplash?
Over a sink: yes, if coated with water-resistant finish. Above a stove: no, heat exposure can damage both wood and wine. - Do I need professional help for installation?
For heavy shelves or masonry walls, yes—professional installers ensure studs and anchors are secure, preventing accidents. - What’s the lifespan of a wood wine rack?
With proper finish, climate control, and occasional re-coating, a solid hardwood rack can last decades, often becoming a family heirloom.


