


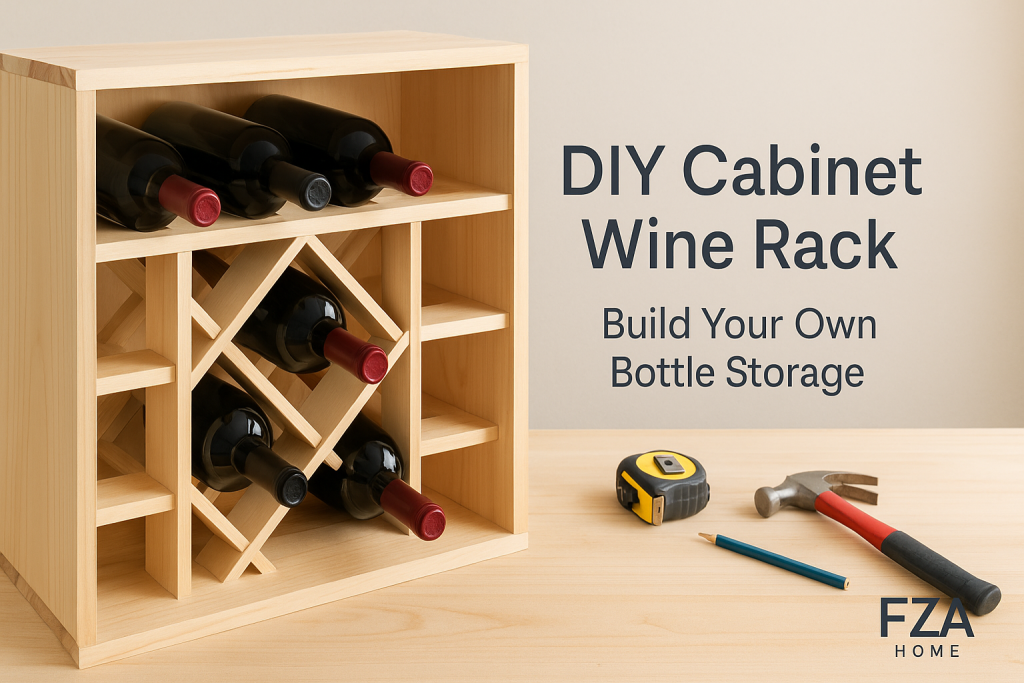
Love wine but tired of those bottles rolling around your kitchen counter or cluttering up precious pantry space? A cabinet wine rack is the perfect blend of function and style—and building it yourself adds that personal flair money just can’t buy.
Integrating a wine rack into an existing cabinet helps you save space, especially in smaller kitchens, apartments, or bar areas. It turns a simple cabinet into a custom wine nook, and you don’t need to spend hundreds on a prebuilt wine cooler or rack. Whether you have a few favorite vintages or a growing collection, this project adapts easily to your needs.
Besides space efficiency, there’s the visual appeal. A DIY cabinet wine rack gives your space a custom-designed upgrade without breaking the bank. It’s a conversation starter, a showpiece, and a practical solution all in one. It lets you turn unused or underutilized cabinet space into something elegant, useful, and uniquely yours.
And let’s not ignore the satisfaction factor. Creating your own wine rack from scratch is just plain cool. You’ll learn a few handy skills along the way, and every time you grab a bottle, you’ll feel proud knowing you built that beautiful storage system with your own two hands.
Benefits of DIY Wine Storage Solutions
So, what’s the big deal about going DIY instead of buying a premade rack? First off, customization. No store-bought rack knows your space better than you do. When you build it yourself, every inch is optimized. Have a narrow cabinet? Build a vertical wine rack. Want something discreet? Go for a pull-out or hidden rack. The options are endless.
Then there’s the cost factor. Buying a custom wine rack or built-in solution can be surprisingly expensive—often several hundred dollars. Doing it yourself? Depending on the tools and materials, you could have a beautiful rack for under $50.
Another bonus? DIY projects often lead to better quality. You get to choose your materials, double-check your construction, and make adjustments as needed. No flimsy MDF or low-grade plastic. Just real craftsmanship, tailored to your style and standards.
Plus, the project is surprisingly beginner-friendly. With a basic saw, drill, and measuring tape, most people can complete a simple wine rack over a weekend. And the result? A stunning focal point that makes your kitchen or bar area look like it belongs on a Pinterest board.
Love wine but tired of those bottles rolling around your kitchen counter or cluttering up precious pantry space? A cabinet wine rack is the perfect blend of function and style—and building it yourself adds that personal flair money just can’t buy.
Integrating a wine rack into an existing cabinet helps you save space, especially in smaller kitchens, apartments, or bar areas. It turns a simple cabinet into a custom wine nook, and you don’t need to spend hundreds on a prebuilt wine cooler or rack. Whether you have a few favorite vintages or a growing collection, this project adapts easily to your needs.
Benefits of DIY Wine Storage Solutions
So, what’s the big deal about going DIY instead of buying a premade rack? First off, customization. No store-bought rack knows your space better than you do. When you build it yourself, every inch is optimized. Have a narrow cabinet? Build a vertical wine rack. Want something discreet? Go for a pull-out or hidden rack. The options are endless.
Then there’s the cost factor. Buying a custom wine rack or built-in solution can be surprisingly expensive—often several hundred dollars. Doing it yourself? Depending on the tools and materials, you could have a beautiful rack for under $50.
Another bonus? DIY projects often lead to better quality. You get to choose your materials, double-check your construction, and make adjustments as needed. No flimsy MDF or low-grade plastic. Just real craftsmanship, tailored to your style and standards.
Plus, the project is surprisingly beginner-friendly. With a basic saw, drill, and measuring tape, most people can complete a simple wine rack over a weekend. And the result? A stunning focal point that makes your kitchen or bar area look like it belongs on a Pinterest board.
Step-by-Step Building Process
Preparing the Cabinet for Conversion
Before you cut a single board, clear out the chosen cabinet completely. Remove all shelves, hardware, and any debris. Inspect the interior walls and floor of the cabinet—patch any holes with wood filler, sand smooth, and wipe away dust. If your cabinet has a back panel that’s too thin or damaged, consider reinforcing it with a strip of ¾″ plywood: this will provide extra stability for mounting the rack.
Next, paint or stain the interior (if desired) before you install the rack. It’s far easier to apply finish coat(s) now than to attempt touch-ups around tight corners later. Apply one or two even coats of primer, let dry, then follow with your chosen stain or paint. Finish with a clear polyurethane to protect against spills. Allow at least 24 hours of curing time so that no sticky residue transfers to your bottles.
Finally, mark your layout. Using a pencil and a level, draw the locations of your shelves, dividers, or lattice on the cabinet walls. Double-check all measurements—this is the step where accuracy pays off. Once you’re confident in your layout, you’re ready to start cutting and assembling the rack components.
Cutting and Assembling the Racks
With your design drawn, it’s time to cut your wood pieces. Measure twice, cut once: each horizontal shelf, vertical divider, or diagonal strip must match your design dimensions exactly. For horizontal cubbies, cut shelf boards to the interior width of your cabinet minus ½″ (for clearance). For diagonal or X-style dividers, use a miter saw or a careful handsaw to angle your cuts at 45° or as designed.
Lay all pieces out on your workspace to confirm fit before gluing. Then, apply a bead of wood glue along each joint, insert the pieces, and clamp them firmly. If you’re building X-style shelves, start at the back, hold the crossed boards in place, then secure them with 1¼″ finishing nails driven through pre-drilled pilot holes. Check for square with a carpenter’s square after each joint is set.
Allow the glue to cure fully—usually a minimum of 30 minutes to an hour—before removing clamps. Do a dry fit inside the cabinet to ensure everything aligns with your pencil markings.
Installing the Wine Rack in the Cabinet
With your rack assembled and fully cured, it’s time to install it. Position the rack inside the cabinet, aligning it with your layout lines. Using a level, ensure the rack is perfectly horizontal—wine bottles won’t sit securely on a tilted shelf.
Secure the back of the rack to the cabinet’s back panel using 1½″ screws driven through the plywood reinforcement. For the front, drill pilot holes through the rack face frame into the cabinet’s side walls, then insert 1¼″ screws. Use small decorative plugs or wood filler to conceal the screw heads if aesthetics matter.
If you’re installing a slide-out rack, attach the drawer slides to the cabinet walls first, following the manufacturer’s instructions. Then mount the rack onto the opposite half of the slides, test for smooth operation, and make minor adjustments to ensure even spacing and friction-free movement.
Finally, reinstall any doors or attach new hardware—handles, knobs, or magnetic catches—so your DIY wine rack looks seamless and professional.
Finishing Touches: Sanding, Staining, or Painting
After installation, there’s one last step: the finish. Lightly sand any exposed edges or surfaces with 220-grit sandpaper to remove rough spots or glue squeeze-out. Wipe with a tack cloth to remove dust.
If you stained your wood before assembly, apply a second coat of clear polyurethane to the entire interior, including your newly installed rack. This seals and protects against humidity and accidental spills. For painted finishes, touch up any scuff marks with matching paint, then apply a water-based clear coat for durability.
Add small felt feet to the bottom of the rack if you want to protect the cabinet floor. Finally, consider lining each shelf or cubby bottom with felt or cork pads to cushion bottles and muffle any rattling.
Customizing Your Wine Rack Design
Horizontal vs. Vertical Bottle Placement
One of the most fundamental design choices is how you orient your bottles. Horizontal placement keeps wine in contact with the cork, maintaining a moist seal that prevents oxidation—ideal for long-term storage. It also allows you to stack bottles in rows, maximizing space. However, horizontal racks require about 12–14 inches of depth.
Vertical storage, in contrast, lets you showcase labels upright, making selection easier. It works well for short-term storage or for bottles you access frequently. Vertical racks can be narrower—8–10 inches deep—saving cabinet space. Just be mindful that vertical storage can dry out the cork if bottles stand for months; consider adding a small humidity puck or periodic rotation.
Depending on your collection and space, you might combine both. For instance, horizontal cubbies for long-term aging bottles and a small vertical section for current favorites or sparkling wines.
Adding Shelves or Glass Holders
A truly custom wine cabinet does more than hold bottles—it can also accommodate stemware, decanters, and accessories. Adding a row of under-shelf glass holders transforms unused overhead space into neat glass storage. These are simple metal rails that screw into the underside of a shelf, cradling wine glasses by their bases.
If you entertain often, consider installing a small pull-out tray just below the top shelf for corkscrews, bottle stoppers, and tasting notes. Another option is an open shelf above or below the bottle racks for decanters or wine-aerating tools.
Be sure to plan these additions in your initial measurements. Glass racks require a minimum overhead clearance of 5–6 inches, and pull-out trays need enough depth to clear the cabinet door when extended.
Incorporating LED Lighting for Flair
For a high-end touch, integrate LED strip lighting inside your cabinet. Warm white LEDs along the top edge can softly illuminate your bottles and labels, creating a wine-cellar ambiance in your own home. Use battery-powered, peel-and-stick LED strips if you want a tool-free installation. These strips often come with remote controls for adjusting brightness and color temperature.
Wire-in options require drilling a small hole in the cabinet back for the power cable; a hidden external transformer can be mounted inside a lower cabinet or behind adjacent furniture. Always use low-voltage LED systems to minimize heat—wine doesn’t like high temperatures.
With LED lighting, your DIY wine cabinet moves from purely functional to a showcase piece—perfect for highlighting special vintages or impressing guests.
Space-Saving and Stylish Ideas
Under-Counter Wine Rack Concepts
If you have unused under-counter space—perhaps next to your sink or beneath a bar island—consider installing a shallow pull-out wine rack. These racks are typically 8–10 inches deep and can hold 6–12 bottles horizontally. The pull-out design gives easy access in tight kitchens, and when closed, it looks like just another cabinet panel.
Another under-counter option is a recessed inset rack: cut into the toe-kick area beneath your cabinetry. You lose some ventilation, but you gain about 3 extra rows of bottles in otherwise wasted space. Just ensure the toe-kick opening has enough airflow or install small vent grilles.
Under-counter racks blend seamlessly with your cabinetry, making them virtually invisible until you need them.
Repurposing Unused Kitchen Cabinets
Sometimes the best wine rack is a repurposed cabinet you already own. Old telecommunications cabinets, glass-fronted china hutches, or even antique dressers can be converted. Simply remove existing shelves, reinforce the interior, and add your custom rack inserts.
Repurposing saves money and gives character: imagine a vintage radio cabinet holding your collection behind a fold-down door, or a shallow china cabinet with glass-paneled wine storage. Just verify that the cabinet depth is at least 12 inches for standard bottles, and add reinforcement if needed to support the weight.
Hidden or Slide-Out Wine Rack Features
For a hidden-storage solution, build your rack inside a cabinet with doors that match the surrounding millwork. Add magnetic catches for a seamless look. Slide-out racks take it further: install heavy-duty drawer slides so your rack glides out smoothly, revealing your collection without ever opening a door.
You can even integrate a wine rack behind a false drawer front or under a flip-down keyboard tray in a home office—wine storage where you’d least expect it. These covert options maximize style and surprise factor.
Maintenance and Longevity
Keeping the Rack Sturdy and Safe
Over time, the weight of bottles can loosen joints or hardware. Every six months, check all screws, bolts, and glue joints. Tighten any loose hardware and reapply wood glue to joints showing gaps. If your rack is sliding in and out, lubricate the drawer slides with a dry silicone lubricant to maintain smooth action without attracting dust.
For open racks, periodically inspect for sagging shelves. If you notice any bowing, add a mid-span support underneath or replace the shelf with a thicker piece (¾″ to 1″).
Cleaning and Preserving Wood Finish
Dust your wine rack every month with a microfiber cloth. For sticky spills (like a cork leak), wipe immediately with a damp cloth and mild soap, then dry thoroughly. Avoid harsh chemical cleaners that can strip finishes. Once a year, apply a fresh coat of clear polyurethane to surfaces where bottles rest to maintain moisture resistance.
If your rack has metal components (like glass holders or slide mechanisms), wipe them with a rust-preventative oil or specialty cleaner to prevent corrosion.
Temperature and Humidity Considerations
Though a small cabinet doesn’t control room conditions, you can improve wine-storage environment by locating your rack away from heat sources like ovens or dishwashers. If your kitchen is prone to high humidity, place a small silica gel pouch inside the cabinet to absorb excess moisture. Conversely, in very dry areas, a humidity puck (used in wine coolers) can keep corks from drying out.
Room temperature should ideally stay between 55°F and 68°F (13°C–20°C). If your kitchen fluctuates outside this range, consider moving valuable or long-term bottles to a cooler part of the house.
Budget Breakdown and Cost-Saving Tips
Cost of Tools and Materials
A basic toolkit—if you need to purchase everything—might cost around $150 to $200: circular saw ($80), drill/driver ($70), clamps ($20), and incidental bits/accessories. However, if you already own or can borrow tools, your out-of-pocket expense drops dramatically.
Materials for a 12-bottle horizontal rack using pine or poplar typically run $30 to $50. Higher-end woods like oak or maple may push material costs to $75–$100. Add stain or paint ($15), polyurethane ($10), and hardware (screws, slides, glass holders: $20)—you’re still under $200 for a custom, built-in solution.
Tips for Saving Money Without Sacrificing Quality
- Borrow or Rent Tools: Local hardware stores often rent saws and sanders by the day for a fraction of the purchase price.
- Use Pine or Poplar: These woods are inexpensive, take finishes well, and offer solid durability.
- Shop Salvage Yards: Reclaimed wood and recycled hardware can be both eco-friendly and budget-friendly.
- Batch Projects: If friends want similar racks, buy materials in bulk to get volume discounts.
- DIY Finishing Solutions: Instead of expensive lacquers, use water-based polyurethane which is cheaper, low-odor, and easy to apply.
By planning wisely and leveraging what you already have, you can build a beautiful cabinet wine rack for under $150—a fraction of the cost of a commercial built-in.
Common Mistakes to Avoid
Miscalculating Measurements
One of the most frequent missteps in DIY wine rack construction is getting the measurements wrong. Whether you’re hurried or overconfident, neglecting to double-check the cabinet’s interior dimensions can lead to components that don’t fit, wasted wood, and unnecessary frustration. Always measure the width, height, and depth of the cabinet space with a reliable tape measure—then subtract a small clearance (at least ½ inch) for ease of insertion and removal. Don’t forget to account for the thickness of your boards: a shelf cut to the exact interior width will bind against the sides if you ignore panel thickness. Sketch your design to scale on graph paper or in a simple digital tool to visualize clearances. Taking the time to plan and re-measure at each stage saves both time and money, preventing a half-built rack that sits in the corner collecting dust.
Choosing the Wrong Wood Type
Wood choice profoundly impacts both the look and longevity of your wine rack. Opting for a low-grade material like particleboard might seem cost-effective, but it often leads to sagging shelves and moisture damage—especially in humid kitchen environments. MDF can swell and warp when exposed to even a little condensation or cleaning splashes. Instead, select solid woods such as pine or poplar for moderately priced durability, or premium options like oak or maple if your budget allows. If you prefer a sleek modern look, birch plywood offers strength with a smooth veneer finish. Whatever you choose, ensure boards are a minimum of ¾ inch thick to support the weight of multiple bottles without bending. Investing in quality materials upfront prevents structural failures down the line—and it looks better too.
Ignoring Proper Ventilation
Wine needs a stable environment with moderate humidity and airflow to protect both the bottle and its cork. When converting a closed cabinet into a wine rack, it’s tempting to prioritize aesthetics over practicality—but neglecting ventilation can cause mold, musty odors, or corks to dry out. Avoid sealing the cabinet airtight: leave small gaps between slats or panels, install slatted or mesh-back shelves, or drill discreet ventilation holes in the back panel. For tighter spaces, incorporate breathable inserts—like thin plywood with slots—or use activated charcoal sachets to absorb excess moisture. Ensuring consistent air circulation not only preserves wine quality but also keeps your DIY investment in top shape.
Real-Life DIY Success Stories
Transformations by Homeowners
Take Sarah from Portland, Oregon: she repurposed an under-stair cabinet into a stunning 20-bottle wine display. Using reclaimed pine, she built horizontal cubbies with staggered shelving to accommodate both standard and larger bottles. She added LED strip lighting along the top edge, creating a cozy showcase in her living room. The result? A personalized wine nook that blends seamlessly with her mid-century modern décor—and cost under $100 to build.
Innovative Designs from Small Spaces
In New York City, apartment dwellers often lack room for traditional wine storage. Josh, a renter in a Chelsea studio, converted a narrow kitchen cabinet into a pull-out wine tower. By installing slim, heavy-duty drawer slides and crafting vertical slots just 8 inches deep, he stored 12 bottles without sacrificing floor space. He even added a small under-shelf drawer for corkscrews and bottle stoppers. His custom solution proved that even the tiniest urban kitchens can house a clever wine storage system.
Alternatives to DIY Wine Racks
Ready-to-Assemble Options
If you’d rather skip woodworking altogether, many manufacturers offer affordable, ready-to-assemble cabinet wine racks. Brands like ClosetMaid and Prepac provide modular kits that fit standard cabinet openings. These kits usually include pre-cut shelves, hardware, and easy-to-follow instructions, letting you enjoy custom-looking wine storage with minimal effort.
Modular and Expandable Racks
Modular wine rack systems—such as Elfa or IKEA’s KOMPLEMENT—allow you to mix and match components to fit unusual spaces. You can start with a basic rack for 6–12 bottles and expand later by adding extra shelving units or drawers. The flexibility makes these systems ideal for evolving collections or rental homes where permanent alterations aren’t allowed.
Hiring a Custom Carpenter
For those seeking a truly seamless, built-in look, professional carpenters can craft bespoke wine cabinets that integrate perfectly with your cabinetry. While this route is more expensive—often $500 to $1,500 depending on complexity—it guarantees precise fitment, high-end finishes, and professional-grade hardware. Custom work is best if you have irregular cabinet dimensions or desire intricate designs like curved lattices or stained-glass doors.
Conclusion and Final Thoughts
Building your own cabinet wine rack is a rewarding project that combines creativity, functionality, and cost savings. From meticulous planning and accurate measurements to choosing the right materials and ensuring proper ventilation, each step influences both form and function. Whether you transform an under-counter nook, repurpose an old cabinet, or select ready-to-assemble alternatives, the goal remains the same: to create a beautiful, practical home for your wine collection.
By avoiding common pitfalls—like measurement errors, poor material choices, and neglecting airflow—you’ll end up with a sturdy, long-lasting rack that enhances your space. Real-life examples demonstrate that DIY solutions can rival store-bought options in both style and durability. And for those seeking simplicity, modular systems or professional carpentry offer alternative paths.
Ultimately, a thoughtful cabinet wine rack keeps your bottles organized, accessible, and protected, elevating both your storage and your décor. Whether you’re a casual sipper or a serious collector, crafting a custom wine rack tailors your home to your passion.
FAQs
What type of wood is best for a wine rack?
Solid woods like pine and poplar offer affordability and strength, while hardwoods such as oak or maple provide premium durability and aesthetic appeal. Avoid particleboard and MDF, which can warp or sag under moisture and weight.
How do I make sure bottles don’t roll out?
Incorporate raised lip edges or semi-circular cutouts in each shelf segment. Adding thin cork or felt pads helps cushion bottles and increase friction, preventing sudden sliding.
Can I add a wine rack to a bathroom cabinet or unusual space?
Yes—provided the cabinet is away from direct steam and heat sources. Ensure proper ventilation by drilling small holes or using slatted inserts. Always maintain consistent room temperature and humidity for wine preservation.
What’s the ideal bottle angle for storage?
Horizontal placement (0° angle) is best for long-term storage, keeping the cork moist and airtight. For short-term or frequent access, slightly inclined (5°–10°) racks can showcase labels while still maintaining cork integrity.
Is it safe to keep wine in the kitchen cabinet?
Yes, if the cabinet is distant from ovens, dishwashers, and heat-producing appliances. Ensure moderate, stable temperatures (55°F–68°F) and adequate ventilation to prevent cork drying and preserve wine quality.


